Description
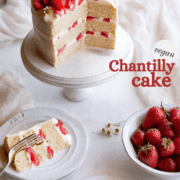
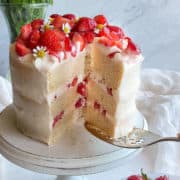
This vegan vanilla cake is light, fluffy, and stays moist for days! Complete with berries and a delicious dairy-free cream cheese chantilly frosting, this versatile cake is perfect for layering for birthdays and celebrations. It'll be difficult to stop after your first slice!
Ingredients
*All ingredients must be at room temperature
Makes 6 cups of batter (fills three 6-inch round pans with 2 cups each — see notes)
- 6 tablespoons (90 ml) aquafaba
- 3 tablespoons (22.5g) cornstarch
- 1 tablespoon vegan butter (to grease pans)
- 2 2/3 cups (325 g) all-purpose flour (See Note)
- 1 1/4 cup (250 g) sugar
- 2 1/4 teaspoons (11 g) baking powder
- 1/5 teaspoon baking soda (just a pinch)
- 1/2 teaspoon (3 g) table salt
- 3/4 cup + 1 tablespoon (185 g) unsalted vegan butter
- 3/4 cup + 3 tablespoons (210 ml) soy milk (See Note)
- 1/4 cup (50 ml) vegetable oil
- 1 tablespoon (15 ml) vanilla extract
- 3 cups Chantilly frosting (or another frosting of choice)
- 2 cups strawberries (chopped, See Note)
OR
Makes 4 cups of batter (fills one 8-inch round pan)
- 4 tablespoons (60 ml) aquafaba
- 2 tablespoons (15 g) cornstarch
- 1 teaspoon vegan butter (to grease pan)
- 1 3/4 cup (220 g) all-purpose flour (See Note)
- 3/4 cup (170 g) sugar
- 1 1/2 teaspoons (7.5 g) baking powder
- 1/8 teaspoon baking soda (just a pinch)
- 1/3 teaspoon (2 g) table salt
- 1/2 cup (125 g) unsalted vegan butter
- 1/2 cup + 1 tablespoon (140 ml) soy milk (See Note)
- 2 tablespoons (30 ml) vegetable oil
- 2 teaspoons (10 ml) vanilla extract
- 1 1/2 cup Chantilly frosting (or another frosting of choice)
- 1 cup strawberries (chopped, See Note)
Instructions
Make the Batter
1. Start by bringing all the ingredients to room temperature. This is a crucial step that needs some planning—but it's still okay if you forget. Simply microwave the chilled vegan butter (in very small cubes) and/or milk in 10-second increments, mixing each time, until at or close to room temperature. Make sure not to melt the butter or overheat the milk!
2. Preheat the oven to 350ºF (180ºC). Grease the cake pans with softened vegan butter with a pastry brush and place a round parchment paper at the bottom, then grease the top of parchment paper as well.
3. Make the vegan egg replacer by mixing the aquafaba with cornstarch in a small bowl and set it aside.
4. Place the dry ingredients (all-purpose flour, sugar, baking powder, baking soda, and salt) into a large bowl and whisk. Sifting the flour isn't necessary. Add the room-temperature butter and mix with a hand-mixer or stand-mixer (on low) until the mixture looks like coarse sand. This usually takes less than a minute.
5. Add the rest of the ingredients (soy milk, oil, vanilla extract, and egg replacer) and mix for two full minutes to build just enough gluten structure. Use the high setting of a hand mixer or the medium setting of a stand mixer. I suggest setting a timer for this since most of us aren't great at estimating the passage of time. Also, make sure to scrape the bowl at least once as you're mixing to prevent lumps of flour from forming.
6. Divide the batter into pans up to ¾ full, ideally weighing them to make sure the layers will be even. Each 6-inch round pan will have about 360 grams of batter. Cover the pans with cake strips if you absolutely don't want any doming. I personally don't mind it as I can taste the cut-out dome before serving the cake to others, always a plus.
Bake & Chill the Cakes
1. Place the pans into the oven to allow free airflow (two on top, one on the bottom rack). Bake for 18 minutes, then switch the placement of the pans for evenly baked layers by placing the top two on the bottom on different sides (left to right, right to left) and placing the bottom one on the top.
2. Bake for another 5 minutes and check to see if a toothpick comes out clean. If it doesn't, then bake for longer in increments of 2-3 minutes until all the cakes pass the toothpick test. The cakes take exactly 26 minutes to bake in my oven, but your oven's heat output may be different—that's why we start checking early. The 8-inch round pan will take approximately 5-7 minutes longer.
3. Remove cakes from the oven and lightly tap them on the counter. Place on a cooling rack and let them cool for about 15 minutes, until the pans are barely warm. Take the pans off the cooling rack and place the cooling rack on top of the cake. One palm on the bottom of the pan, the other palm on the bottom of the cooling rack, hold on tight, and flip. Carefully remove the now upside-down pan. Repeat for other pans.
4. Cool the cakes completely on the cooling rack for at least 2 hours, then carefully wrap them in plastic wrap and place them into the refrigerator or freezer to firm up for about 30 minutes minimum. I usually leave them in the refrigerator overnight, but don't chill for longer as they may dry out without a crumb coat (thin layer of frosting).
5. If using vegan chantilly cream with this cake, prepare it as the cakes are cooling down. Keep in mind that the vegan cream cheese also needs to be at room temperature.
Assembly
1. Start by leveling out the cakes. Use a sharp serrated knife to cut out the dome. You can save the leftover pieces to make cake pops or trifle.
2. Place a teaspoon of frosting into the middle of the cake platter. Cut out four 3-inch thick strips of parchment paper and place them around the frosting. This helps the cake not move around during assembly, and there won't be any cleanup necessary.
3. Place the first layer of cake, bottom side up (as in, bottom side during baking). Spoon about a cup of the frosting on the cake and smoothen with an offset spatula (or spoon). Don't go all the way to the edge since the weight will push the frosting out. Place 1/3 of the chopped strawberries.
4. Repeat with the second and then place the final sponge layer, making sure the bottom side is up again. Frost the top and the sides. If your kitchen is hot and the cake/frosting got too warm and crumbly, chill the cake after applying a light layer of frosting. This so-called "crumb coat" will protect the cake from drying out while being chilled.
5. Add the strawberry topping as close to serving as you can to avoid any juices bleeding on the frosting. Remove the strips of parchment paper, and the layer cake is finally ready!
6. To get clean slices, cut with a sharp knife. Dip it into hot water and scrape with a paper towel/cloth napkin before cutting again. Note that cakes made with the Chantilly frosting can't be left at room temperature for longer than 2-3 hours—they will melt down due to the cream cheese base.
7. If there's any leftover cake, wrap it with cling wrap and refrigerate for up to a few days. This cake stays moist for at least three days when stored like this—but it'll taste best when fresh.
Notes
Pan Size — This recipe lists two options (three 6-in round pans or one 8-in round pan). To modify according to what you have, first, figure out how much cake batter or frosting you need by going to this calculator. It takes the shape (square or rectangular or cupcake pan) and dimensions into account. Next, compare it to our recipe's ingredient list that makes 6 or 4 cups of batter. For example, if you found out you need 8 cups of batter—multiply each quantity in the second list by 2 ( 4 x 2). Note that baking times will vary so use the toothpick test.
Flour Type — You don't need cake flour for this recipe as we'll be using the reverse creaming method where a bit of structure is needed. I've tested the recipe with Swans Down cake flour—which makes the cake even more tender. But this also means a weaker structure. Therefore, cake flour isn't ideal for vegan layer cakes, but perfectly fine for sheet cakes, etc.
Milk — My milk of choice is soy, but most kinds will work. Try to use unsweetened, unflavored non-dairy milk with minimal ingredients. Avoid canned coconut milk as it will have too much fat and impart too much flavor (unless you're modifying the recipe to make coconut cake).
Round Parchment Paper — If you don't have round parchment paper—fold a sheet of parchment multiple times until you get a thin triangle with a sharp edge. Flip over the cake pan, place the sharp tip of the triangle right at the center, and cut the excess over the radius of the bottom of the pan. Unfold, and that's it!
Strawberries — I like to divide the strawberries into 4 pieces lengthwise (or more pieces for bigger berries). This way there isn't too much juice bleeding through the sponge. You may also choose to use whole strawberries to top the cake, it'll keep longer that way. Feel free to use other fruits (or chocolate chips/sprinkles etc.) as you wish.
Aquafaba — In case you don't want to use aquafaba, simply substitute it with more non-dairy milk. The cake will be denser and will need to be mixed at least 30 seconds longer to make up for the loss of structure.
Cupcakes — If you'd like to make cupcakes using this recipe, preheat your oven to 400ºF instead. Fill the cupcake liners up to ⅔ high, bake at 400ºF for 5 minutes, then reduce the temperature to 335ºF and bake for another 10 minutes—or until a toothpick comes out clean. The initial high heat results in a higher dome that's desirable in cupcakes.
Torting — If you want to make more layers, feel free to torte the cake (as in, divide each layer in half with a serrated knife). The cake is adequately robust to withstand it. Just make sure it's still chilled as you do so, and note that you may need more frosting for the additional layers.
Freezing — Don't freeze the cake after assembly, but you can freeze the cake sponge layers individually. Wrap them tightly in cling wrap and freeze for up to three months.
- Prep Time: 30 minutes
- Cook Time: 26 minutes
- Method: Bake
- Cuisine: Universal