Description
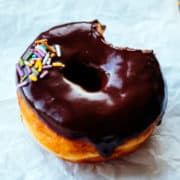
These vegan chocolate glaze donuts are so worth your time! The combination of pillowy soft raised donuts and delicious mirror chocolate glaze is so satisfying!
Ingredients
Scale
Doughnut:
- scant 1/2 cup (100 ml) aquafaba
- 3 tablespoons (22.5 g) cornstarch
- 2 teaspoons (5 g) instant yeast
- scant 1/2 cup (100 ml) water, lukewarm
- pinch of sugar (to mix with yeast)
- 4 cups (500 g) all-purpose flour
- 1/3 cup (65 g) sugar
- 1 teaspoon (6 g) table salt
- 2/3 cup (165 ml) soy milk
- 1/3 cup (80 g) vegan butter, room temperature
- 3+ cups vegetable oil for frying
Chocolate Glaze:
- 2 tablespoons (30 g) vegan butter
- 4 tablespoons (60 ml) soymilk
- ⅔ cup (100 g) semisweet chocolate chips
Instructions
Make the Egg Replacer:
- Mix the aquafaba with cornstarch and set aside.
Bloom the Yeast:
- Mix the yeast with lukewarm water and 1 teaspoon of sugar; set aside until frothy.
Knead and First Proof:
- Place all dry ingredients (flour, sugar, salt) into a large bowl and make a well in the center. Pour in the aquafaba & cornstarch mixture, soymilk, and yeast mixture.
- Mix with a wooden spoon until the dough somewhat comes together. If you want an easier time kneading, let this coarse mixture rest for 30 minutes to autolyze.
- Knead for 10 minutes by hand until smooth, or 5 minutes with dough hook with a stand mixer. Add the softened vegan butter and knead for another 2 minutes to combine.
- Tear a piece of the dough and check if it passes the windowpane test. When the dough is stretched, you should be able to see light through it without the dough tearing. Otherwise, keep kneading to form more gluten bonds.
- Cover with cling wrap and set aside until doubled in size.
- This step is optional, but I'd highly recommend gently deflating, reshaping, then refrigerating the dough overnight after the first proof. Chilling the dough overnight develops more flavor and makes it a lot easier to work with the next day.
Roll and Cut:
- Lightly flour a working surface and place the dough. Gently knead, tap with a rolling pin, and divide into halves. Cover the piece you’re not using with cling wrap.
- Roll out the dough to ½” thickness and cut with a 3 to 3.5-inch, sharp doughnut or biscuit cutter. Make faint indentations with the cutter first to maximize the number of donuts. Cut the middle with a small (½ to 1-inch), circular object or use a donut cutter (this is the one I use). Place these donut holes aside.
- Re-roll the leftover dough, let rest for at least 30 minutes, and repeat—only once.
- If making filled donuts without a hole, you may also divide the dough into equal portions and roll them into smooth balls instead of cutting them.
Second Proof and Dry:
- Place each donut onto an individual small piece of parchment paper (4-in by 4-in) and place them onto baking sheets. Put the trays in an oven (that's off) and place a bowl of boiled water next to them. Close the oven door. The steam will prevent skin from forming on the donuts. Alternatively, you can cover the cut donuts with cling wrap.
- Repeat the cutting and proofing processes for the remaining piece of dough.
- Let the cut donuts rise for 15 minutes to an hour, depending on your kitchen's climate. Gently poke a cut piece of dough with your index finger and observe. If the indentation stays, your dough is properly proofed and ready to be fried. If the indentation immediately returns to the surface and disappears, you'll need to proof for longer.
- When the pieces are properly proofed, take them out of the oven (or remove cling wrap) to dry off the skin for a few minutes.
Fry:
- Start heating the frying oil as soon as the first batch of dough is cut to minimize the chances of over-proofing. Pour vegetable oil into a heavy-bottomed pan at least 2-3 inches high and checking with a thermometer, heat to 375ºF.
- Test with a donut hole—they should turn golden brown in 30-45 seconds on each side. Make sure to start frying the batch you started proofing first.
- Place 2 or 3 donuts into the frying pan at a time along with the parchment paper. Remove the parchment paper after a few seconds with tongs.
- Let the underside take on a golden brown color (about 45-60 seconds) then turn and fry the second side. Be conservative with the color: when the frying oil drains off the donut, it will seem darker. Chopsticks or a Danish dough whisk are very helpful when turning the donuts.
- Remove fried donuts with a steel mesh spider and transfer them onto paper towels. Let the donuts cool on a wire rack before glazing.
Make the Glaze:
- In a small, shallow, and microwave-safe bowl, combine the butter and the plant milk then microwave on medium for about 1 minute. Remove from microwave and stir in chocolate until melted and smooth.
- If some of the chocolate is still solid after stirring, continue to microwave at 15-second intervals, until the glaze is completely smooth.
- Using a microwave is the quickest method to make this chocolate glaze. But if you don't own one, use a double boiler (bain-marie) to melt all the ingredients together.
- This glaze needs to be used immediately, as it will harden. You can microwave it at 15-second increments again to smoothen it.
Glaze & Enjoy:
- Dip the filled donuts into the bowl to glaze them. If you are running out of chocolate glaze for the last few donuts, drizzle the glaze over the donuts instead. Enjoy!
- These donuts are best enjoyed on the very same day you make them. To eat on the next day, make sure to fill & glaze right after cooling and keep it at room temperature in an airtight container. You may also freeze fried donuts individually and thaw, fill, and glaze them when ready to eat.
Notes
Please use a scale.
These donuts are best enjoyed on the very same day you make them. To eat on the next day, make sure to glaze right after cooling and keep it at room temperature in an airtight container. You may also freeze fried donuts individually and thaw & glaze them when ready to eat.
Times for kneading and proofing are estimates. Go for the windowpane and poke tests to judge the next steps.
- Prep Time: 1 hour
- Cook Time: 30 minutes
- Category: Dessert
- Method: Fry
- Cuisine: Universal
Nutrition
- Calories: 265